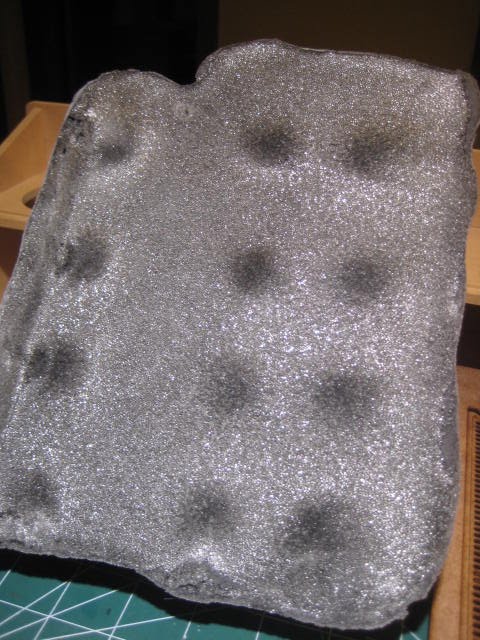
We first went over Jim's preferred method for doing marble, though I can also see this technique being applied to painting flames as well. You can see the results I got with this method in the picture above on the base to the left. Next we discussed how to paint tiled floor and paving stones so as to achieve as much depth as possible and then got to practice it ourselves, resulting in the center base pictured. Finally there was time at the end to do one more style of marble that used a very simple stippling technique followed by some blended brushwork. This was how I painted the base on the right side of the photo. Even though it wasn't what I was expecting, I still really enjoyed this class and would love to incorporate what I learned into my own painting and modeling. I'm very happy with how my bases turned out and I'm sure I'll find at least a few miniatures in the future who would like to stand on a beautiful marble floor.
Metallics with a Shine

Renowned painter Mathieu Fontaine was our instructor for this class, as well as several of the other classes that I took at AdeptiCon. All total I was in five seminars for more than twelve hours with Mathieu as my instructor, so of all my teachers I feel like I became most familiar with both his painting and methodology. Not that I am anywhere even remotely near his level of ability, just that I had the most time to observe and study how he approaches his own projects. Mathieu is a truly gifted artist and is now one of my painting heroes. It is no surprise why he has won so many awards at the major painting events and competitions. At this year's AdeptiCon he entered three miniatures in the Rogue Daemon competition, winning first place for each one in their respective categories as well as the award for best overall.
As my introduction to painting the Mathieu Fontaine way, which is quite different from how I normally paint, I struggled a bit with the actual techniques he presented to us in this class. It was however entirely based on true metallics rather than the fancy NMM stuff so everything we went over was readily applicable to almost every painter of scale models. Mathieu did a really good job going over painting and color theory and devoted a decent amount of time in each class to these discussions. It was evident that he really wanted to make sure we understood why we were doing things in such a manner. We then got to try out the techniques on a pretty cool warrior elf lady model, focusing in particular on her shield and arm plates for practice doing silvers and then the armor plates covering her shoulders for practice painting gold. Finally we talked about how to apply these techniques when painting any type of blade, although the spearpoint on our elf's weapon was not suitable to this lesson as it had some sculpted details on its surface.
The highlight of this class for me was getting to see in person some examples of Mathieu's painted miniatures. He passed around the room his entry for the historical miniatures category, a 54mm Spaniard which he named El Torres, to show us what we were aiming for with his style of painting metallics. The piece is absolutely stunning, as were all of his other work that I was able to check out, and getting to see it with my own eyes left me speechless. To see more of his work, be sure you check out his painting weblog at
akaranseth. I find it to be very inspiring and a great resource as he has information on upcoming classes that he will be teaching in addition to a number of invaluable online tutorials.
Building and Painting Historical Armies

This was my last seminar on Friday, going from 10pm until sometime after midnight. The focus at AdeptiCon is very much on sci-fi and fantasy gaming so I was not too surprised that this was the only one of my seminars that was not well attended, though I'm sure the hour of night had more than a little to do with that. There were only five or six of us students for this one, plus our instructor, Dave Pauwels of
Rabid Bat Studio. What did surprise me, however, was that within our group there was only a single Flames of War player as I had assumed this class would draw more people from the multiple FoW tournaments going on that weekend. I'm curious if a class specifically addressing painting smaller scale miniatures like the 15mm guys used in FoW or DBA would have gotten more FoW people.
I was really excited about the inclusion of a seminar specifically geared for historical miniatures and was very happy with how the evening went. This was a discussion-based class with Dave providing miniatures from his collection to illustrate for us some of the concepts about which we talked. The focus was mainly on those areas that distinguish painting historical miniatures from working on other more fanciful projects, in particular the extra challenges and commitment involved in "getting it right." To that end we spent a good amount of time talking about the essential process of researching one's subject matter in order to achieve a realistic appearance. I'm a fairly experienced researcher and have a longtime love of history so none of this was new to me, but it was still a lot of fun in that setting to talk about the myriad joys of looking things up. I love historical gamers... we're a nerdy niche within an already nerdy niche hobby! Funny to think that there was a time when all wargamers were of the historical variety.
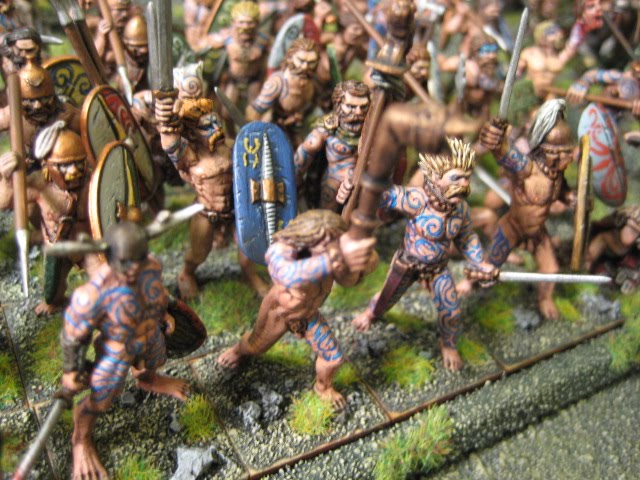
After that we moved on from the preliminary planning stages into the actual painting of historical miniatures. Dave talked to us about some specific things that can come up, such as representing camouflage and flags, that might not be encountered as commonly in sci-fi and fantasy games. I thought probably the most useful portion of the night for me was when the discussion turned to the topic of painting horses. I am not a horse person and have little real life experience with them, but they're everywhere in my historical projects. Dave offered a lot of solid advice and some great tips on how to achieve a natural equine appearance. We also touched on realistic weathering and went over some simple techniques which served as a good preview of what I would see in my seminar the next day on weathering. This was one of my favorite classes and it was a great time talking about historical gaming with fellow enthusiasts. Combined with seeing up close Bennet's Celtic army, this class has fired my desire to not only get back to working on my 15mm historical projects but to take the plunge and start a 25mm army for Warhammer Ancient Battles. There are just so many potential armies to choose from, it will be very difficult for me to decide which to collect.
His introduction succinctly covered all the major areas of information needed to go from a complete novice to a reasonably competent caster. Topics included terminology, types of plaster and their suppliers, molds, casting, construction techniques, and a number of online resources related to working with Hirst Arts products. He even spent some time going over more advanced subjects like casting with resin and how to make one's own rubber molds. Next Rich demonstrated the entire process involved in casting one mold of plaster pieces, and then it was our turn to have some fun. Each student was able to do two sessions of casting so that when we were done everyone was able to cast four molds of bricks, pipes, or whatnot. Between casting sessions as our first set dried we were each given a bag full of pieces Rich had previously cast for us and a square section of MDF. We were therefore able to construct our own little bit of usable gaming scenery and, depending on which bag you got, ended up finishing the class with either an area of gothic-looking ruins, big industrial piping, or a small futuristic building. As can be seen in the very first picture of this post, I put together a two story sci-fi bunker thing.
Even if you're not that interested in making a lot of terrain, I would still recommend this seminar to any wargame or modeling hobbyist. I genuinely did have that good of a time. Rich is an excellent instructor and had with him a bunch of really cool finished pieces to help illustrate the potential for casting with Hirst Arts. Although it is not a technically challenging experience, it is a completely unique aspect of this hobby and Rich's class is an excellent introduction to it. Plus you leave with your own personalized bit of plaster terrain and enough extra blocks for another smallish sized terrain piece. At this point I'm not sure if it would make sense for me to invest in buying my own molds and plaster, but I can see how awesome these products would be for either a group of gamers or a dedicated terrain builder.
Painting Monstrous Faces
 This was the second of my five seminars taught by Mathieu Fontaine. After the first class with him I was a little frustrated because I knew I just wasn't getting it yet. It's hard for me to explain but I feel as if he more than any of the other instructors truly challenged the conventions of painting miniatures with which I am familiar, especially in his usage of colors for shading and highlights. I started to get this sense during the class on metallics but didn't fully appreciate how much of a departure this was going to be until just before halfway through this class on monstrous faces. It was at times tough to adapt my normal way of painting and more than once I caught myself slipping into my customary ways.
After some discussion of theory we started work on our miniatures. Mathieu did a consistently good job of choosing interesting miniatures for each of his classes and all of them were a real joy to paint. He had us first practice the techniques of this class by painting the torso and arms of our goblins. I finally started to understand what it was that I was trying to achieve, but was still far removed from being able to successfully pull it off. Next we moved on to the real focus of this class which was painting our goblins' gruesome little faces. At this point I felt like I was really tuning in to what Mathieu was pushing us to and I ended up being generally happy with how my guy's mug turned out. Mathieu was great about circulating throughout the room as we worked on our miniatures so that he could offer personal assistance to those of us who needed extra tutelage. This was true for all of his classes and was something I definitely appreciated about his method of instruction.
Weathering with Acrylics, Dry Pigment, and Oil Paint

Up next was another round with Mathieu Fontaine as instructor, this time presenting to us a variety of the more advanced techniques used for realistic weathering. I grew up on military models and so these were effects I have seen and admired for a long time, I've just always been too intimidated to give any of them a try. Even though we weren't able to practice any of these lessons during the seminar itself, Mathieu was very thorough in his demonstration of them and in answering any questions that came up. It's amazing how simple most of these techniques really are and how quickly they can be achieved. After watching him present his live tutorials I feel confident that with the right materials I could now accomplish some nice weathering effects myself without too much trouble.
Once he had finished his introduction to the subject he reviewed with us the variety of materials and products that he would be using during this course. I don't have any type of formal background in art and so these were all new to me and the information he provided was very helpful. He started with normal acrylic paints but his application of them was certainly new to me. He showed us how the standard acrylic paints we use to paint miniatures can also be used to create cool splatter and chipping effects with either a sponge, a stipple brush, or even just your normal paintbrush. I was impressed with how good these looked considering they did not require any of the fancier art-store type of materials. Next he went over how to use pigment powders, something I am very eager to try out as soon as possible. Not only did he show us the more standard ways of using these pigments but also demonstrated how they can be used on bases and was able to produce an amazing urban base using nothing but the pigment powders.
The final major technique he taught to us was how to use oil paints on our miniatures. The ease with which this is done was probably most surprising to me as I had imagined anything with oils would have to be exponentially harder. In reality though there are some things that are actually easier to achieve with oil paint than with acrylics simply because oils stay wet and workable for so much longer, allowing you to really push the paint around and get extremely subtle blending and fading of the colors. As things dried Mathieu quickly presented a couple of other useful methods for weathering. He showed us the basics of airbrushing exhaust, rust and corrosion with pigment powders, chipping with a masking agent, and lining with inks. This was a great class and would be invaluable to treadheads of all skill levels.
Lose the Fear: Working with Greenstuff

Joe Orteza's class on sculpting with greenstuff was initially one of my primary motivations for signing up to go to AdeptiCon. I've been an admirer of his work for years so the opportunity to learn sculpting from him was just too good to pass up. Although I do not harbor any great desire to make sculpting original pieces a major part of my hobby, it would nonetheless be nice to make modifications to miniatures without being limited to whatever bits I happen to scrounge up. I've made a couple of very modest attempts at using greenstuff in the recent past but with significant unease and marginal success. I was therefore particularly excited about this seminar.
Joe is a fantastic teacher and extremely good at what he does. We each were given a large envelope containing Joe's guide to sculpting, a set of four sculpting tools, and a small glass mirror. The sculpting tools alone are probably worth the amount of money it cost to register for this class, making all of his instruction and everything else essentially a bonus... nice! Joe began by discussing the tools we would be using as well as some other more specialized ones that can be helpful in certain situations. There was also some general talk about greenstuff and its properties, planning a project, and model prep. After just minutes we jumped in and were mixing our blue and yellow strips.
Our first project was sculpting a purity seal, but the seemingly simple act of getting the mixed putty to stick to my mirror proved to be my first challenge. The greenstuff felt to me extra sticky so that it took a lot of water to keep it from sticking to my fingers or wrist. But by that point my cone or snake or blob of greenstuff would be so slippery that I kept dropping them onto the floor. I'm sure I stomped more than my share of greenstuff into the hotel's carpet that day. Then when I would manage to hang on to the stuff, there was still so much water that it would slide all over my mirror. Eventually I got my water issues under control but after that it always felt like I was a couple steps behind the rest of the class. It wasn't a problem though as Joe's reference guide is very well illustrated making it easy to follow the instructions while still working on a previous step.
After the purity seal we moved on to sculpting a section of chain, a feather, and a cloak on which we practiced making furry texture. While we were working on our projects Joe described key additional steps involved in numerous other types of common sculpting tasks such as gems, tassels, hair, sashes, and Chapter badges. He also discussed issues of support and layering. He passed around a bunch of incredible samples of his work. It was funny comparing my greenstuff "chain" that more resembled a line of squishy donuts to the flawless ones he sculpted onto his insane Inquisitor-scale Chaos Marine Raptor. Despite my troubles I found the experience extremely helpful as it was informative and really motivational as well. The stuff I sculpted may look silly but I feel like I understand the process, now it's just a matter of practice. That's encouraging, possibly the best thing a beginner like me could get out of a class like this. I'll take his class again if I ever get the chance.
Moving Forward: First Steps to Advanced Painting

My last seminar on Saturday night was a four hour painting class with Mathieu Fontaine. So far I had been in hobby classes for 20 hours since Thursday night but I did not feel nearly as drained as I had thought I would. Sure I was yawning some by the end of class but otherwise I was pleasantly surprised with my painting stamina, not to mention the heroic performance of my eyes in not giving out on me the whole weekend...thanks to my peeps! Armed with caffeine and brushes, I was ready.
By this point I was pretty comfortable with Mathieu and had gotten over my initial intimidation. I therefore really wanted to get as much as I could out of these final hours of painting as my remaining seminars on Sunday were to be entirely discussion and demonstration. Perhaps more importantly I had also become accustomed to the rapidity of his speech and his Quebecois-accented English. He was readily available for personal assistance and I availed myself of his critique frequently as he circled our table of painters. He really pushed me to get out of my painting comfort zone and I appreciated his honest and direct criticism and suggestions. The material for the class was broadly similar to those earlier classes I had with Mathieu, but this seminar offered ample time to really practice these techniques with the opportunity to ask all manner of questions.
It was a real treat getting to meet so many great painters and to get to know the other students in the classes with me. There was a group of us who were in almost all of the same classes together which helped build a friendly atmosphere... always a plus when painting toy soldiers! I think the lateness of hour that Saturday also played its part and it started to feel like a late-night painting session with old friends. I particularly enjoyed this aspect of these seminars and I appreciate AdeptiCon offering so many that this was possible. The picture above is of one of my classmate's miniature which he painted that night. I think this fellow's tunic in particular does a good job showing the application of Mathieu's approach to color and lighting with its bold yet smooth transition of vibrant hues. I want my painting to get better and I believe Mathieu's classes helped accomplish that.
Stepping Up Your Game: Painting to a Competition Level

I had to drag myself around somewhat on Sunday morning after being up so late the night before. Rather than going straight to bed as I should have, I instead hung around the main hall as the final round of open bits trading was wrapping up before playing cards into the wee hours of the monring, catching up with my old buddy
DrGabe. I was therefore somewhat relieved that for Chris Borer's seminar all I had to do was sit there and listen. Oh, and of course drool over some of the coolest display pieces I have ever seen. This class was basically entirely theory-based, although referring to Chris's advice and wisdom as theory really is an insult to his body of work. We each received a 12 page reference guide packed full with advice and tips, as well as full-color photos on every page and it is probably one of the most valuable things I received during my entire time at AdeptiCon.
Chris Borer is yet another award winning painter recruited to teach at AdeptiCon and as I began flipping through his booklet I recognized lots of the miniatures from the pages of White Dwarf magazine. It was a particular thrill for me when he began passing his actual models around the room. I thought it was a great idea that Chris brought along each of the miniatures he had used to illustrate his reference guide so that we could see in person how he applied the concepts being discussed. Plus it's just cool to look at awesome models that have been beautifully painted. Also it was fun hearing Chris describe his thought process for the various pieces and explain how certain ideas came about and how he implemented them.
This class covered a tremendous amount of information and there just wasn't enough time to go over all of it. After a brief introduction that included Chris's thoughts on so-called "requirements" necessary to produce winning competition pieces, the first primary topic discussed was a thorough review of all manner of tools, brushes, and materials. Chris fielded a bunch of questions about primers and brushes before moving on to the topics more specifically related to competition-level modeling and painting. He discussed the importance of planning out one's concept and elements of composition, conversions, bases, and the usage of display plinths. He also spent some time giving advice on working with greenstuff and a solid overview of casting techniques.
After that the remainder of the class zeroed in on crucial aspects of painting and the theory on which they rest. The topics discussed included contrast and harmony, lighting, shadow, colors, washing vs. glazing, painted weathering, metallics, eyes and faces, and brushwork. I think this seminar was the most ambitious in its scope and breadth of subjects addressed. The class ran a bit over the scheduled time and I unfortunately had to leave so as to not miss the beginning of my next seminar. It looked like Chris was more than happy to stay as long as necessary, though, to answer more questions and to critique miniatures of those interested. I didn't have anything with me but there were a few painters in the class who wanted to avail themselves of Chris's expert opinion. Chris was one of the primary judges for the Rogue Daemon competition so I thought this was a great opportunity that he offered for people to get insight into how a painting judge looks at actual entries. Once again I was impressed with how accessible and helpful our instructors were at AdeptiCon. So this was yet another quality seminar and was very rewarding, I just wish we had more time to spend. I don't think it would be hard for a group of painters to spend the whole day with someone like Chris and even then still have more to discuss.
Airbrushing for Figurines

And so we have come to my last seminar at AdeptiCon, fitting then that it would be once again with Mathieu Fontaine. My first run at using an airbrush was close to ten years ago and at the time I had felt overwhelmed and really did not know what I was doing... I eventually stopped messing around with it after worrying that my compressor might possibly have been causing my apartment building to collapse. So I was therefore very interested in learning not only about the proper usage and functioning of an airbrush but also whether or not it is even something that I should consider using. I love the realistic appearance and smooth blending of colors that is possible with an airbrush but it is certainly a much more technical craft and demands a sizable investment of money as well. In hope of avoiding another costly series of mistakes as I made with my initial foray into airbrushing, I felt like I needed to know more to make a reasonable decision on this instead of randomly jumping in feet first. This was my main motivation for wanting to take this particular seminar.
I appreciate that Mathieu did not assume anything about our base of knowledge and instead started with a complete breakdown of an airbrush into its various components. He reviewed not only how all of it functions and what all the little pieces are for but he also thoroughly discussed the cleaning and care involved in having a well-maintained airbrush. He also talked about some of the major manufacturers of airbrushes and gave us his opinions regarding their various strengths and weaknesses, as well as his overall preferences. This was all really useful advice since buying a crappy airbrush can be a very expensive mistake. Similarly we also were presented with information concerning air compressors, their usage and maintenance, and the range of psi at which various tasks can be accomplished. Mathieu lastly discussed the types of paints that can be used and the proper method for thinning them so as to ensure everything functions as expected, as well as a few points regarding spray boxes.
Mathieu then kicked his compressor into action and began showing us proper usage of the airbrush and effective painting techniques. He gave a lot of practical advice on how to become comfortable using an airbrush and demonstrated a variety of simple painting exercises as a way of learning how to control the device and the application of paint. Even though it may not be glamourous or a whole lot of fun, I know from my past experience with an airbrush that time spent on this type of practice is invaluable. Seeing Mathieu perform these exercises made it very clear to me what I should be trying to achieve before even picking up a miniature that I would like to paint. He spent the rest of the class painting a rather distinguished looking 28mm fellow, pausing frequently to pass the miniature around the class so that we could each see the various stages of the process. It was neat just being able to watch someone work in an area in which they excel and I really appreciated this opportunity.
At the outset of this seminar I had a rather narrow understanding of the uses of an airbrush and had no idea of its potential for painting just about any type of miniature. I had believed that airbrushing was mainly limited to larger models like tanks and planes so it was stunning for me to see Mathieu working on significantly smaller areas, such as the shadowy areas beneath an outstretched arm or a particularly jutting chin. Having now seen how airbrushing works and gotten a sense of its uses and benefits, I think I will be sticking with my old fashioned brushes for the foreseeable future. I do not think I am ready to invest hundreds of dollars into the equipment necessary for quality airbrushing, at least not until my skill and ambition get to the point at which it becomes warranted. As much as I like the look of an airbrushed tank, it can wait... which means this class has saved me, for the time being at least, a lot of frustration and money. Plus if I do end up getting an airbrush, I'll be sure I follow Mathieu's advice and start by practicing on terrain.

Papa JJ gets a picture with Joe Orteza
So that was my experience at the AdeptiCon seminars. While attending one of the biggest gaming conventions in the country, I still somehow managed to go the whole time without rolling a single die... a little odd for someone calling his weblog "diceRolla," but oh well. I had a really awesome time and had lots of fun. I definitely want to go next year and would happily register for many of the same seminars if they were offered again. Overall I was more than satisfied with the quality and content of the classes and the teachers were of exceptional talent and ability. I truly wish I could have taken more, there just wasn't enough time.
The only consistent problem I saw was the generally poor quality of paints available for use by the students. We were supplied with a few plastic storage containers filled with Vallejo paints, many of which were in bad condition being either watery or else dried out. I saw at least three paint-bottle explosions, one of which splattered a fellow's well-painted Dreadnought in Chaos Black while he was showing it off to his neighbor. In another incident with a clogged Vallejo bottle the unlucky user was blasted with dark blue paint getting all over his shirt, arms, face and hair. It sucked for him but it was funny to see it happen to someone else. I knew there was a reason I stopped using Vallejo.
Fortunately a few of the teachers had brought with them a good selection of P3 paint pots and allowed us to use them during the classes. After getting to use P3 a lot over the weekend I am now a big fan of these paints. I think P3 and the Foundry System will be the way for me to go in the future as they seem to be very similar paints and should work well together. As for the Vallejo, I appreciate the difficulty faced by the organizers with having to provide paint for so many people. I wonder if it would be possible to get someone like Privateer Press to sponsor the hobby seminars in the future and provide paint themselves. Seems like it would be a good chance to make some converts... it would certainly be good exposure as the vast majority of people I talked to had never used P3 before but were all quite impressed with them.
Setting the paints aside as it was mostly a minor issue, the best thing for me about attending the seminars at AdepiCon was getting to meet so many great people and talk to them about our shared passion for painting and modeling. It was really cool to see in person the instructors' amazing models, quite a few of which I recognized as major award winners from years past. DrGabe and I were talking about this on the last day and he mentioned how cool it was for him to see Chris Borer's Slaaneshi marines. Years ago DrGabe was collecting an Emperor's Children army and at the time drew much inspiration from the very same miniatures that were passed around during Chris's seminar. That type of opportunity is unique to events like AdeptiCon and helps make such gatherings so worthwhile.
I am truly grateful that I was able to make the trip this year and to have such kind and talented individuals as my teachers and classmates alike. Everyone genuinely seemed happy to be there and excited to share their knowledge and experience with like-minded enthusiasts. After spending even just a couple of hours with them, I would not feel any hesitancy about contacting my instructors with questions or requests for help. Plus I learned lots of useful tips and new techniques which I look forward to incorporating into my own painting repertoire. Finally, the experience was incredibly inspiring and has ignited a desire to really push my hobby to new levels... not bad for a couple of days spent sitting in a hotel meeting room!


